

Understand NgIf and NgSwitch Directives in Angular 11
Angular offers striking features helpful for implementing amazing UIs. It is empowered by an ivy compiler that handles faster testing, build errors, debugging, etc. Besides, it even allows you to use Webpack module federation with Angular CLI and plugin jointly to create individual UI loading shell components.
Angular has many built-in directives. All these directives offer special behavior to DOM elements. In this blog, we will discuss ngIf and ngSwitch directive, know that how to conditionally add or remove an element from the DOM using the NgIf and NgSwitch directives.
NgIf
The NgIf directive is used whenever we want to display or remove an element depending upon different conditions. If the condition is false then the element of directive is attached to will be removed from the DOM.
The difference between [hidden]=’false’ and *ngIf=’false’ is that the first method normally hides the element. The second method with ngIf removes the element entirely from the DOM.
We determine the condition through passing an expression to the directive which is assessed in the context of its host component.
The syntax of NgIf is the following:
*ngIf=”<condition>”
Let us use this in an example that, each person has age as well as a name.
Let us add a NgIf directive to the template so we can only show the element if the age is less than 35, like the following:
ng-if-demo.component.ts
import { Component, OnInit } from ‘@angular/core’;
@Component({
selector: ‘app-ng-if-demo’,
templateUrl: ‘./ng-if-demo.component.html’,
styleUrls: [‘./ng-if-demo.component.css’]
})
export class NgIfDemoComponent {
people: any[] = [
{
“name”: “Kapil Sharma”,
“age”: 40
},
{
“name”: “Suresh Albela”,
“age”: 32
},
{
“name”: “Aashish Pativala”,
“age”: 39
},
{
“name”: “Satendra Sharma”,
“age”: 44
},
{
“name”: “Kapil Jangir”,
“age”: 37
}
];
}
ng-if-demo.component.html
<h4>NgIf Demo</h4>
<ul *ngFor=”let person of people”>
<li *ngIf=”person.age < 35″> (1)
{{ person.name }} ({{ person.age }})
</li>
</ul>
The NgIf directive removes the li element from the DOM in case that person.age is lower than 35. If we run the above we will see the following output:
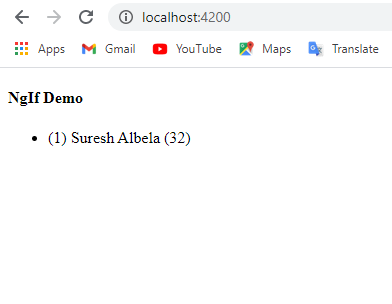
Figure 1: Output of the ngIfDemo
Important
We may not have two structural directives, directives starting through a*, attached to the same element. The following code would not work:
<ul *ngFor=”let person of people” *ngIf=”person.age < 35″>
<li>{{ person.name }}</li>
</ul>
Note: This is just as similar as Angular 1’s ng-if directive precisely Angular does not have a built-in substitute for ng-show. To implement something comparable you can bind to the [hidden] property or use the NgStyle or NgClass directives.
NgSwitch
The [ngSwitch] directive on a container determines an expression to match against the expression which are given by ngSwitchCase directives on view inside the container.
Let us think we want to display people’s names in several colors based on where they are from. Green for Rajasthan, Red for Gujarat, Blue for Punjab
Using Bootstrap, we can change the text color by using the text–success, text-danger, text-primary, and text-warning classes.
We can solve this by using a series of *, ngIf statement looks like the following:
<ul *ngFor=”let person of people”>
<li *ngIf=”person.state ===’Rajasthan'”
class=”text-success”>{{ person.name }} ({{ person.state }})
</li>
<li *ngIf=”person.state === ‘Gujarat'”
class=”text-primary”>{{ person.name }} ({{ person.state }})
</li>
<li *ngIf=”person.state === ‘Punjab'”
class=”text-danger”>{{ person.name }} ({{ person.state }})
</li>
<li *ngIf=”person.state !== ‘Punjab’ && person.state !== ‘Rajasthan’ && person.state !== ‘Gujarat'”
class=”text-warning”>{{ person.name }} ({{ person.state }})
</li>
</ul>
This originally seems to make sense before we try to create our else style element. We have to check to see if the person is not from any of the states we have determined before. Resulting in a little long ngIf expression and it will only get worse the more states we add.
Most languages with JavaScript, have a language construct known as a switch statement to solve this type of problem. Angular also offer us similar functionality through something called the NgSwitch directive.
This directive enables us to render several elements depending on a given condition the NgSwitch directive is some directives working in conjunction like the following:
ng-switch-demo.component.ts
import { Component } from ‘@angular/core’;
@Component({
selector: ‘app-ng-switch-demo’,
templateUrl: ‘./ng-switch-demo.component.html’,
styleUrls: [‘./ng-switch-demo.component.css’]
})
export class NgSwitchDemoComponent {
people: any[] = [
{
“name”: “Kapil Sharma”,
“age”: 40,
“state”: “Punjab”
},
{
“name”: “Suresh Albela”,
“age”: 32,
“state”:”Rajasthan”
},
{
“name”: “Aashish Pativala”,
“age”: 39,
“state”:”Madhyapradesh”
},
{
“name”: “Satendra Patel”,
“age”: 44,
“state”:”Gujarat”
},
{
“name”: “Kapil Jangir”,
“age”: 37,
“state”:”Rajasthan”
}
];
}
ng-switch-demo.component.ts
<ul *ngFor=”let person of people”
[ngSwitch]=”person.state”> (1)
<li *ngSwitchCase=”‘Rajasthan'” (2)
class=”text-success”>{{ person.name }} ({{ person.state }})
</li>
<li *ngSwitchCase=”‘Gujarat'”
class=”text-primary”>{{ person.name }} ({{ person.state }})
</li>
<li *ngSwitchCase=”‘Punjab'”
class=”text-danger”>{{ person.name }} ({{ person.state }})
</li>
<li *ngSwitchDefault (3)
class=”text-warning”>{{ person.name }} ({{ person.state }})
</li>
</ul>
App.module.ts
import { BrowserModule } from ‘@angular/platform-browser’;
import { NgModule } from ‘@angular/core’;
import { AppRoutingModule } from ‘./app-routing.module’;
import { AppComponent } from ‘./app.component’;
import { NgIfDemoComponent } from ‘./ng-if-demo/ng-if-demo.component’;
import { NgSwitchDemoComponent } from ‘./ng-switch-demo/ng-switch-demo.component’;
@NgModule({
declarations: [
AppComponent,
NgIfDemoComponent,
NgSwitchDemoComponent
],
imports: [
BrowserModule,
AppRoutingModule
],
providers: [],
bootstrap: [AppComponent]
})
export class AppModule { }
- We bind an expression to the ng directive which is ngSwitch.
- The ngSwitchCase directive lets us specify a condition if it matches the expression in (1) will give the element it is attached to.
- If none of the conditions are met in the switch statement it will check to see in case there is a ngSwitchDefault directive, if there is it will give the element that is attached to, though it is an option that if it is not present it simply displays nothing if no matching ngSwitchCase directive is existed or found.
The important difference between the ngIf solution is that through NgSwitch we evaluate the expression only once and then select the element to display depending on the result.
If we run according to the above steps we will see the following output:
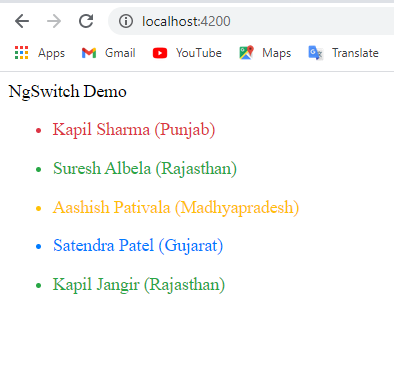
Figure 2: Output of the ngSwitchDemo
Using ngIf we can conditionally add or remove an element from the DOM.
In case that we have experienced with several conditions a cleaner alternative to multiple nested NgIf statements is the NgSwitch sequence of directives.
Conclusion
In this blog, we have discussed ngIf and ngSwitch directives in Angular. These directives are helpful because it allows us to show or hide templates depending on an expression.
Author Bio: Ajay Patel – Technical Director, iFour Technolab Netherlands
A Seasoned technocrat with years of experience building technical solutions for various industries using Microsoft technologies. With sharp understanding and technical acumen, have delivered hundreds of Web, Cloud, Desktop and Mobile solutions and is heading the technical department at Angular Frontend Development Company – iFour Technolab Netherlands.